Showing posts with label Sauces. Show all posts

Tuesday, September 8, 2015

Chicken Biryani With Raitha


Biryani is a favorite dish of this region and it won't be wrong if I'd say, that it's the national dish of Pakistan! You'd find different types of 'Chicken Biryani' just in one town alone so imagine, what diversity this delicious dish holds in itself that you would find a different flavor, look and recipe of Biryani if you travel from one corner to the other of the same city! This dish of cooked meat and rice layered and simmered together was known as a meal of royals as it is a Mughali dish and was made for the kings but as the time passed on, it became a common man's food too. It is served at weddings and special occasions and religious festivities for its extravagance yet, for it being a complete meal, is prepared specially for the weekend dinner as well as during the weekdays. There are different types of Biryani that are prepared in every household and includes not just the different kinds of Chicken Biryani but Biryani made with lamb/mutton/beef, fish, mix vegetables, chickpeas/garbanzo beans as well that I shall share the recipes of all in my future posts, In Sha Allah (God Willing)
Growing up, I remember that Chicken Biryani was one of the family favorite meals prepared by my mother over the weekends but sometimes she even used to surprise us by making it for lunch during the weekdays. I remember feeling so happy after coming back home from school and discovering that we're having Chicken Biryani for dinner :D Oh, the little joys of life! Whenever we had Biryani on a weekend, for dessert it was always the classic Trifle that later I started helping my mother to prepare. I will share the recipe of that Trifle in my next post, In Sha Allah (God willing).
Raitha- a yogurt and vegetables dip is a must with Biryani as it's cooling characteristics really pairs well with the spiciness of this dish and enhances it's flavors too. It is something that we have a special taste preference for at my home so, I thought to share the recipe of it too along with this Biryani I'm sharing with you today. This meal i.e Biryani, Raitha and then Trifle for dessert is still continued to be prepared at ours and we all happily enjoy it with big smiles on our faces :D My Dad is not fond of chicken but likes Chicken Biryani for its delicious combinations of flavors and aromas. We sometimes pair Shaami Kebabs (lentils and meat kebabs) with Biryani to make it a perfect meal :)


The first Biryani I ever cooked was by using a spice mix available in the stores. My parents were out of country a couple of years back and we siblings were feeling quite low and sad missing them esp, our Mom and her presence. She had already cooked some meals for us and stored them in the freezer and the only thing we had to do was to reheat it after coming back from school but over one weekend, we terribly craved for Chicken Biryani and I decided to make it by using the mix as for the time zone difference, I couldn't ask my Mom the recipe of her special Chicken Biryani. The instructions were already printed on the Masala pack and by following them, I managed to make an acceptable yet palatable version of Chicken Biryani the recipe of which also called for adding some potatoes in it. I then regularly carried on with making Biryani by using the Masala (spice mix) pack even after my mother arrived back but as I got hold of the entire procedure of the Biryani making, I started adding the spices myself instead of using the pack. I modified the recipe too and totally made it my own which is entirely different from both my mom's and the classic way or the one I learnt by using the pack. I like to do things quickly and and try to make the procedures easy too. Time consuming recipes do not fancy me and the time constraints I face, doesn't leave me with the patience to stand in the kitchen for long and to go through the tedious methods of cooking classic dishes. The recipe of Biryani that I'm going to share with you is quite lengthy and uses loads of ingredients but believe me, its all worth it and much quicker than the regular recipe! It's my very own yet has all the flavors spices and aroma of the classic Chicken Biryani :)

Let's get some Biryani love Unleashed today, shall we? :D 


Chicken Biryani with Raitha

Ingredients:

For Chicken Masala

Chicken: 1 kg/2.20 lbs (skinless and cut into 12 pieces)
Yogurt: 2 1/2 cups
Onions: 5 medium sized (thinly sliced)
Tomatoes: 4 medium sized (chopped)
Ginger & Garlic Paste: 2 tbsp.
Green Chillies: 2 (finely chopped)
Salt: 2 tbsp.
Red Chili Powder: 1 tsp.
Turmeric Powder: 1/2 tsp.
Coriander Powder: 1 tsp.
Garam Masala Powder: 1/2 tsp.
Cumin Seeds: 1/2 tsp.
Cinnamon Stick: 1 
Black Peppercorns: 6
Cloves: 4
Nutmeg: 1/4 tsp. (freshly ground)
Mace: 1/4 tsp. (freshly ground)
Black Cardamom: 1 
Green Cardamom: 2
Star anise: 1
Dried Plums: 10-12
Potatoes: 3 medium sized (cut into thick wedges and soaked into some water with a pinch of Saffron yellow food coloring)
Fresh Coriander/Cilantro Leaves: 1/4 cup (chopped)
Fresh Mint Leave: 1/4 cup (chopped)
Oil: 1 cup

For the Rice

Basmati Rice: 4 cups (soaked in plenty of water for at least an hr before cooking) 
Cumin Seeds: 1/2 tsp.
Cinnamon Stick: 1
Black Peppercorns: 6
Cloves: 4
Black Cardamom: 1
Green Cardamom: 2
Star anise: 1
Green Chilli: 1
Fresh Mint Leaves: 1/4 cup
Oil: 2 tbsp.
Lemon: 1 small sized (cut into slices)
Salt: 1 tbsp.
Water: 8-10 cups (to boil the rice)

To go between the layers

Ginger: 1 inch piece (jullienned)
Tomato: 1 medium sized (cut into slices)
Green Chillies: 2 (jullienned)
Lemon: 1 small sized (cut into slices)
FreshCoriander/Cilantro Leaves: 1/2 cup (finely chopped)
Fresh Mint Leaves: 1/2 cup (finely chopped)
Yellow/Saffron Food Color: 1/4 tsp.
Kewra Water/Essence: 2 tbsp water/2,3 drops essence
Garam Masala Powder: 1 tsp.

Method:

  1. Put the chicken pieces in a large bowl and marinate it with the beaten yogurt, ginger and garlic paste, salt, red chilli powder, turmeric powder, coriander powder, cumin powder, Garam Masala powder and all the other whole spices. Cover it with a cling wrap and let it marinate for an hour in the fridge.
  2. Heat the one cup of oil in a large, heavy based pot. Take out the potato pieces from the water, pat them dry with a kitchen towel and fry till they are cooked and are of pleasant yellowish golden color. Take them out on an absorbent paper and keep aside.
  3. Now fry the sliced onions in the same oil till they are golden. Take out half of them and spread on an absorbent paper.
  4. Put the marinated chicken in the remaining oil and the fried onions in the pot along with all of it's yogurt marinade and add the chopped tomatoes to it too. Cover with the lid and cook over medium flame till the chicken is cooked and onions, yogurt  and tomatoes forms a thick, sort of dry masala/gravy and oil is separated. Use water if the chicken is not cooked and cook till its done.
  5. Now add the chopped mint and cilantro/coriander leaves, dry plums, fried potatoes and sprinkle some more Garam Masala over the chicken gravy and mix everything together.
  6. Boil 8-10 cups of water with the whole spices listed under the rice ingredients along with the green chilli, mint leaves, salt, the lemon slices and oil.
  7. Once the water starts boiling, add the pre-soaked and drained rice into it and boil till they are half done. Drain out in a colander and keep aside but reserve 1/4 cup of water from the rice. 
  8. Grease a heavy based pot, preferably the same in which you boiled the rice, with some oil taken out from the chicken masala and pour the reserved water from the rice into the pot before adding the first layer of rice to it. This will prevent the rice from sticking at the base while the Biryani simmers.
  9. Spread one layer of rice in the bottom of the pot and top with the chicken gravy, some tomato slices, lemon slices, green chillies, mint and cilantro and some fried onions, repeat the layers (I normally make 5 layers; 3 layers of rice and 2 layers of chicken)
  10. On the final layer, drizzle some yellow food color dissolved into a little Kewra water or dissolve the food coloring into some plain water and add the essence to it and mix well before using.
  11. Sprinkle some Garam Masala on top and cover the lid with a damp tea towel and place it tightly on the pot. Place it over high flame for a min and then simmer for 20-25 mins. You can simply put the pot into a preheated oven (200 C/392 F/Gas Mark 6) instead for that final step but cover the lid with some aluminium foil instead of a damp tea towel. The pot should be oven proof otherwise you can spread the layers into a Pyrex/oven proof dish instead.
  12. Once done, mix with a light hand and fluff the rice. Take out into a serving platter, garnish with some crispy fried onions and serve with chilled, thick Raitha and Shaami Kebabs if you like. 
Serves 6-8


Raitha

Ingredients:

Thick Yogurt: 4 cups
Milk: 1/4 cup
Cucumber: 1 large sized (finely chopped or grated)
Onion: 1 medium sized  (finely chopped) 
Tomato: 1 medium sized (finely diced)
Green Chilli: 1 (finely chopped. Optional)
Fresh Mint Leaves: 1/4 cup (chopped)
Fresh Coriander/Cilantro Leave: 1/4 cup (chopped)
Salt: 1 tsp
Cumin Seeds: 1/2 tsp
Chaat Masala: 1/4 tsp (optional)

Method:

  1. Put yogurt along with the milk, salt and half of the cumin seeds into a medium mixing bowl and beat well with the help of a hand-held whisk.
  2. Add all the chopped vegetables to this beaten yogurt and mix well. Reserve some mint and coriander/cilantro leaves for garnishing.
  3. Take out into a serving bowl and sprinkle some Chaat Masala on top (if using) the cumin seeds and the remaining mint and coriander/cilantro leaves.
  4. Chill well before serving.
Serves 6-8


Notes:
  1. All the whole spices, the Garam Masala and Chaat Masala and Basmati rice can be found easily at the ethnic stores.
  2. The marination can be done a day ahead and even the chicken can be cooked ahead for convenience and to save time.
  3. Leftover Biryani can be stored in an air-tight container and stays well up to 2,3 days if kept refrigerated. It can be frozen too up to a month. Just put in the fridge to thaw it completely before heating.  


Phew! That's all my dear readers! :) Seasonings/Spice level and the amount of the ingredients can always be adjusted according to your taste and desire. I hope you enjoy making and eating it. Until next time, keep sharing the goodness of this greatest blessing, that has been bestowed in abundance upon us the lucky ones, with the less fortunate ones.
Thank you and please remember in your Du'as/prayers! :)

*Not be duplicated, rewritten or published without permission- Thank you! 


Friday, August 28, 2015

Homemade Pizza


Pizza is a favorite of everyone; young and old alike! It's Italian by origin but you will find different flavor's of Pizza in every region of the world and in every household, everyone has their own way of making it. Pizza is something that I have literally grown up eating and that my Mom made quite often for us. She learnt making it from one of my Dad's friend's wife, they became our family friends later and we used to visit each other regularly. Both the Uncle and Aunty has passed away now but the memories of the time spent with them are still alive with us. May they both rest in peace, Ameen Sum Ameen.

As a little girl, I remember watching my mother making Pizza with quite an interest and with the anticipation of eating it soon. All of us siblings used to get so excited whenever she announced that she's making Pizza for dinner. I then started offering help to her with putting the toppings on the Pizza base smeared well with the Marinara Sauce or in other words the Pizza sauce which was available commercially. She made Pizza with cooked beef mince mostly with loads of other delicious toppings and lots of cheese covering them all. In it went to the oven to get baked then and the aroma wafting from the kitchen made us expectant children incredibly hungry and happy :D Those were the days when just eating your favorite food made you immensely happy but I still have that child alive inside and I am not willing to let it go ever.
As we grew up older, we always wanted chicken on Pizza therefore, my Mom switched to making with it. 


I remember we once held a Pizza party at home and that was the time when I actually learnt making Pizza from my mother. I was 13 at the time and observed how she kneaded the dough. The recipe that my Mom learnt to make from the Aunty used egg and milk and she always used the jar of Pizza sauce but after some years when I took on the role of the Pizza making myself, I simplified the dough recipe after reading several authentic Italian dough recipes and started making my own Marinara sauce as well.


The Pizza dough that I make, I add wholewheat flour to it along with the all-purpose one and my recipe does neither include any egg or milk powder and nor does it require milk to knead it. The addition of the wholewheat flour not only gives a beautiful color to the pizza crust but does enhance the flavors too. The authentic Marinara sauce recipe does not have any mention of adding dried Oregano leaves in it but I do add it in mine hence, you can say that's the only exception I've made to the authentic method as I love both the aroma and flavor of this herb.


The another trick my mom used and that I have continued using is that after spreading the sauce all over the Pizza base, sprinkle some of the cheese and then put all of your toppings over it and without topping everything with the grated mixed Mozzarella and Cheddar, bake into a preheated and very hot oven.This way it is ensured that both the crust and toppings are well cooked as the ovens at home aren't designed the way they are specially for pizza making in the commercial kitchens hence, by the time the pizza is cooked at home, the cheese gets hard and dark in color. To avoid that mess, we add the cheese after the pizza at cooked. By putting some cheese on the pizza base helps in keeping all the toppings in place and just sticks to the crust and you won't be getting it all over the place :)


After the Pizza is baked and everything including the crust is cooked through, we then top it with loads of cheese and in it goes again to the oven but this time just to melt the cheese and to give some color to it just by turning the top grill on. Once done, we take it out and let stand for a few minutes before serving it with Coleslaw and chilled Coke. This is not a healthy meal by any means but I do make a lighter version of the Coleslaw that I have shared the recipe of in my next post. Please find it here 
We have one round baking pan and the other is square so we always have two shapes of Pizza that we don't mind about at all as long as the Pizza is yummy! :D

Let's get some Pizza love Unleashed today! :D 


Homemade Pizza

Ingredients:

Dough

(for one large Pizza)

All-Purpose Flour: 2 1/2 cups.
Wholewheat Flour: 1 cup
Salt: 1 tsp.
Yeast: 1 pack (yields 2 1/4 tsp, active dry yeast or instant)
Sugar: 1 tbsp.
Olive Oil: 4 tbsp.
Lukewarm Water: as much as required to knead the dough.
Fine Semolina: 3 tbsp.

Marinara Sauce/Pizza Sauce:

Ripe Tomatoes: 500 gm/1.10 lbs (cut into small cubes)
Onion: 1 medium sized (chopped)
Fresh Garlic: 5,6 pods (finely chopped)
Olive Oil: 1 tbsp.
Salt: 1/2 tsp.
Brown Sugar: 1
Dried Oregano Leaves: 1/2 tsp.

Toppings:

Chicken: 1 cup (cooked and shredded or cubed, however you like it)
Bell Pepper/Capsicum1 large (sliced)
Onion: 1 large (sliced)
Canned Mushrooms: 5,6 (sliced)
Olives: 1/4 cup (sliced)
Mozzarella Cheese: 1 cup (grated)
Cheddar Cheese: 1 cup (grated)
Dried Oregano Leave: 1 tsp.
Red Chilli Flakes: 1/2 tsp (optional)


Method:

  1. Mix all the dry ingredients for the dough together in a large mixing bowl expect for the semolina.
  2. If using the dry active yeast, then activate it according to the package instructions.
  3. Make a well in the middle of the mixed dry ingredients and pour the liquids in to it. 
  4. Using a fork, bring the flour in gradually from the sides and swirl it into the liquid. 
  5. Keep mixing, drawing larger amounts of flour in, and when it all starts to come together, work the rest of the flour in with your clean, flour-dusted hands. 
  6. Knead until you have a smooth, springy dough. Place the ball of dough in a large flour-dusted bowl and flour the top of it. 
  7. Cover the bowl with a damp cloth/tea towel and place it at a warm place for about 1 hour or until the dough has doubled in size. 
  8. While the dough proofs or doubles in size, prepare the Marinara sauce.
  9. In a heavy bottomed saucepan, pour the olive oil and let it heat over medium flame.
  10. Now add the chopped onion and the garlic. Add the salt, mix and let everything sweat away for a bit.
  11. Once the onions and garlic softens, add the chopped tomatoes to them along with the brown sugar.
  12. Mix everything together well and cover the pot with the lid.
  13. Let this simmer over slow flame for 10-15 minutes.
  14. Uncover and you will see that lots of juices has been released from all the ingredients mixed together and the tomatoes have turned mushy.
  15. With a help of a hand-held blender, blend everything to the smooth sauce.
  16. Return this sauce over to the flame and cook for a few more minutes. Be careful while cooking the sauce. It will be bubbling over the flame and their is a possibility of the hot sauce getting on to your hand therefore, keep it covered and stir it carefully every now and then.
  17. Once the sauce thickens a fair bit, turn off the flame and let it cool down completely before using. You can store it in an airtight jar and keep it refrigerated and it can stay well for up to 1 week.
  18. Once the dough doubles in size, remove it to a flour-dusted surface and knead it around a bit to push the air out with your hands - this is called punching down the dough. 
  19. You can either use it immediately, or keep it, wrapped in plastic wrap, in the fridge (or freezer) until required. 
  20. If using straightaway, sprinkle semolina over your greased pizza pan. Roll out the dough about 1/4 inch thick and gently transfer it to your pan.
  21. Leave it resting for 15-20 mins while you prepare your toppings. 
  22. Preheat the oven over 200C/400F/Gas-Mark 6.
  23. Spread the sauce over the rolled out pizza dough and sprinkle a little of both the cheeses over it.
  24. Now put all the toppings over it and let the pizza bake into the preheated oven on the middle rack for 15-20 minutes or till everything is cooked through.
  25. Take out the pizza when its done and top this cooked pizza with the remaining cheeses, sprinkle the dried oregano leaves and the chilli flakes over the top.
  26. Place the pizza back into the oven and turn on the top grill. Let it stay under the grill till the cheeses melt and obtain golden color.
  27. Turn off the grill and take it out of the oven. Let it stand for a few minutes before serving.
  28. Serve hot with the salad and drinks of your choice. Enjoy.
Makes one 16 inches Pizza


Notes: 
  1. Dough can be kneaded with the help of a stand mixer and a hook attachment if you do not wish to use the classic way of making it.
  2. Sauce can be made with the canned tomatoes too instead of using the fresh one. 
  3. If you wish to make the sauce spicy, just add a little bit of red chilli powder to it while its cooking. 
  4. The leftover sauce can be stored in an airtight jar and keeps well refrigerated for up to a week. This sauce can also be used in pasta, lasagna or any other dish that requires the use of a Marinara sauce. 
  5. You can use any topping of your choice

That's all Pizza Fans! :) Baking time can always be adjusted according to the type of your ovens. I hope you enjoy ,making and eating it. Until next time, keep sharing the goodness of this greatest blessing, that has been bestowed in abundance upon us the lucky ones, with the less fortunate ones.
Thank you and please remember in your Du'as/prayers! :)


*Not be duplicated, rewritten or published without permission- Thank you! 


Wednesday, August 19, 2015

Mango Chutney


When the mango season is upon us in this region, we tend to make the most of it by preparing whatever we can with this luscious pulpy fruit! Not just in its ripe form but even when its raw and a complete opposite of its ripened self in terms of flavors and texture yet, equally delicious!
I have shared a couple of recipes by using fresh Pakistani mangoes in my previous posts on the blog. You can check them in the list of recipes.
At my household, my Mom makes Acchaar (pickle) with raw mangoes, called Kairee in Urdu, and also Chutney with it. She never made these before and only started making after we moved to Pakistan. She got the recipe from her Khala (maternal aunt) of both and since then, we've never had store bought Achaar :) But Chutney is something that she has only made a couple of times in all these years and the only reason because nobody is that fond of it in my family except for me and it also lasted for an entire year every time since I was the only one who ate it.
I love pairing it with a flaky, crispy plain Paratha (a flat bread made with using Ghee/Butter) any kind of stuffed Paratha and Daal Chawal (lentil curry with boiled rice) 

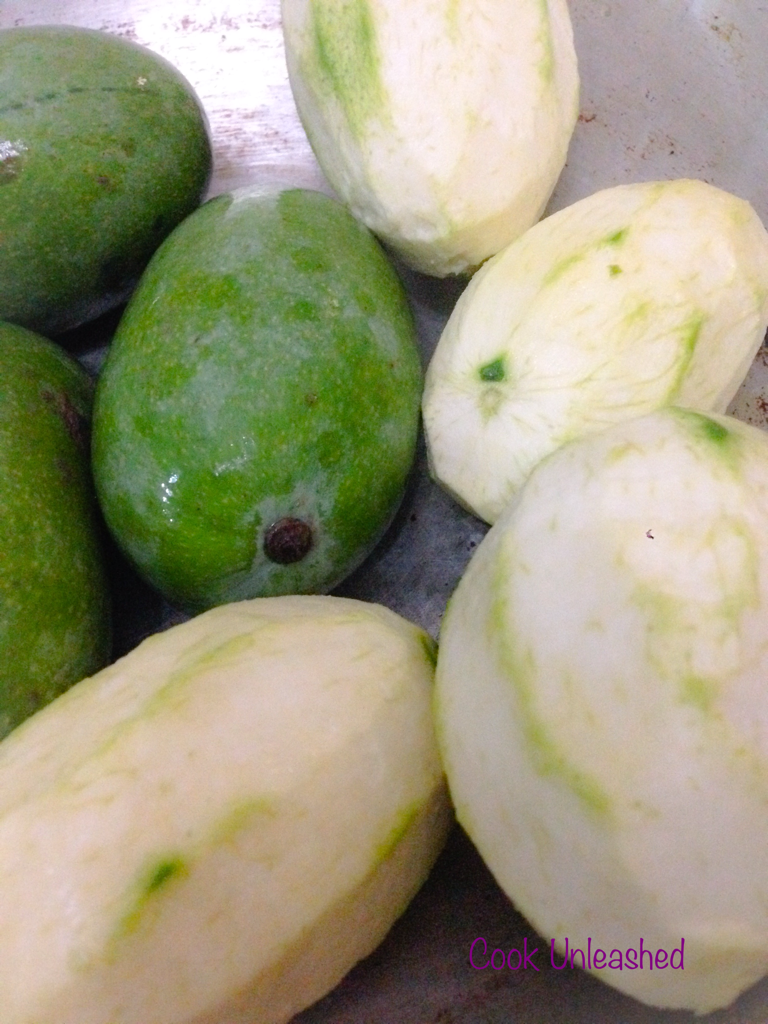
Washed Kairees are peeled 1st
Then cut into thin chips


Last year I made this Chutney with my Mom's help. She did all the preps and I just cooked it and took the photos although I wasn't blogging at the time but it sure was on my mind that maybe some day I will :) I used to take photos with my iPhone, that I still do, that's why my photos aren't anywhere near to all those fancy photos I see on my fellow blogger's blogs but I'm happy with mine at the moment and trying to improve my photography skills while still using my iPhone :)
So, this Mango Chutney we made last year and shared with everyone. The best thing about this Chutney is that it can stay well in the refrigerator for up to an year but only if you have canned it right and the temperature of the fridge hasn't been fluctuating. The best time of making this Chutney is now as the raw mangoes available in the market are not completely raw and you get some ripened bits of it with the fruit too. The method of making this Chutney is time consuming and the entire preparation requires patience but its totally worth it! 

Let's get some spiciness unleashed today! :D


Mango Chutney

Ingredients:

Raw Mangoes (Kairee): 2 kg/4.40 lbs
Granulated White Sugar: 6 cups/1,206 gm/3 lbs
Salt: 1 tbsp.
Red Chili Powder: 1 tsp.
Red Chili Flakes: 1 1/2 tsp.
Garam Masala Powder: 1 tsp.
Turmeric Powder: 1/2 tsp.
Garlic Powder: 1/4 tsp.
Ginger Powder: 1 tsp.
Green Cardamom Powder: 1/2 tsp.
Cumin Seeds: 1 tsp. (Roasted)
Carom Seeds:1/2 tsp.
Nigella Seeds: 1 tsp
White Vinegar: 1/4 cup
Water: For boiling
Almonds: 1/2 cup (blanched)
Sultanas: 1/2 cup

Method:

  1. Wash and peel the raw mangoes. Slice them and discard the stone/seed and cut them into thin chips.
  2. Take plenty of water in a large pot and boil the mango chips. Once start boiling, turn off the flame after 2,3 minutes.
  3. Drain out all the water by putting the boiled mangoes into a colander.
  4. In another heavy bottomed, non-reactive large pot, put the boiled mangoes along with all the ingredients except for the vinegar, almonds and sultanas. Mix well.
  5. Let this cook over medium heat. You'd see that once the sugar and rest of the ingredients are mixed with the mangoes, a lot of juices will be released. keep stirring the mixture from time to time.
  6. Once the juices released starts boiling, lower the flame and let it cook for 20-25 minutes while again stirring regularly. 
  7. After 20-25 minutes, you will see that the juices have thickened. We are aiming at a jam like texture therefore, if you feel that the chutney has thickened enough then turn off the flame otherwise cook for a few minutes more.
  8. After the Chutney is cooked, add the vinegar and stir well. 
  9. Now add the almonds and the sultanas and mix well.
  10. Let the Chutney cool down a little before pouring it into the sterilized jars. To find out how to sterilize the jars, please look at my post of Strawberry Preserves/Jam here.
  11. Can stay good up to an year.
Yields: 3 1000 gm jars


That's all, Chutney Addicts! :) The quantity of the ingredients can always be adjusted according to your desire and convenience but do stick to the ratio. I hope you enjoy making and eating it. Until next time, keep sharing the goodness of this greatest blessing, that has been bestowed in abundance upon us the lucky ones, with the less fortunate ones.
Thank you and please remember in your Du'as/prayers! :)

*Not be duplicated, rewritten or published without permission- Thank you! 


Thursday, June 25, 2015

Chutneys for Ramadan- Sweet & Sour Tamarind Chutney and Green Chutney (with a bonus recipe)


Ramadan (the Muslim Month of fasting) is passing smoothly and steadily. Ma Sha Allah (All Praises to Allah), 6 days have passed already! and before we know, its going to leave us therefore, we should focus more on spiritually gaining from it as much as we can. This month is given to us to purify our souls and we should understand the true essence of it. Roza (fast) is not kept with the intention of taking it as an opportunity to shed pounds or to 'starve' all day to enjoy a grand feast at Iftaar (breaking of the fast) Neither is it to hold grand 'Iftar parties and dinners' to show off wealth and to flaunt dresses and jewelry... Kindly respect the purpose of Ramadan and fast with the best Niyaa (intention). May Allah show and keep us all on the right path. Ameen Sum Ameen and Jazak'Allah Khair! (May Allah reward you)
Having said all that, which I hope didn't sound like me lecturing to you, we also should prepare nice meals for our family and friends and the other believers who aren't capable of doing that on their own; that's the true spirit of this blessed month- Sharing and Caring. 

The most favorite snacks during Ramadan that's literally prepared in every household in this region is definitely fried like Pakoras, Samosas e.t.c along with the other equally favorite savory snack known as Chaat. Now, there are different variety of Chaats prepared during Ramadan that includes Dahi Bharay, Kalay Chanay kee Chaat, Aloo Chanay e.t.c and different condiments are served along to enhance their flavors and the most common of them are two type of Chutneys, Khatee Meethi Imlee kee Chutney (Sweet & Sour Tamarind Chutney) and Green Chutney, that upon paring with these spicy and appetizing snacks, intensifies their tantalizing flavors!
The best thing about these sauces are that they can be prepared ahead and can stay well in the refrigerator for up to a month! Green Chutney however can only stay good up to a week in the fridge but if you plan to freeze it, just pour the prepared chutney in to the ice cube tray and freeze. Once frozen, take out all the frozen cubes in to a freezer safe bag or airtight box and pop it back into the freezer. Just thaw the number of cubes according to your need and use. Bonus tip, the frozen cube can be added to the beaten yogurt to make yogurt chutney or Mint Raitha! (dip) Ta-Da! See, how this tip can come in handy for you and you wouldn't need to make fresh Green Chutney every time.

So let's Unleash some Chutney making today, shall we? :D 


Sweet & Sour Tamarind Chutney

Ingredients:

Dried Tamarind: 500 gm 
White Sugar: 2 cups
Jaggery: 2 cups (3,4 large pieces broken down into tiny pieces) 
Salt: 1 tsp.
Red Chili Powder: 1/2 tsp.
Red Chili Flakes: 1/2 tsp.
Dry Ginger Powder: 1/2 tsp.
Cumin Seeds: 1/2 tsp.
Coriander Seeds: 1/2 tsp.
Cinnamon stick: 1
Black Pepper Corns: 5,6
Green Cardamom: 4
White Vinegar: 2 tbsp.
Water: 6 cups

Method:

  1. In a medium sized heavy bottom pot (avoid using aluminum or silver) add the tamarind along with 2 cups of water and bring it to a boil.
  2. Turn the flame off and let it cool down a bit so that its easier for you to handle it.
  3. Once it cools down, extract the pulp of the soaking tamarind with the help of your hand and discard the seeds.
  4. Now put the extracted pulp along with sugars into a blender jug and blend till its smooth and everything is well blended.
  5. Pour the blended mixture into the same heavy bottom pot and add the remaining water along with the chili powder, chili flakes and the dry ginger powder to it. Turn the flame on and start cooking it over a medium flame.
  6. In another pan, over low flame, dry roast the seeds, cinnamon stick, pepper corns and the cardamom till the aroma releases. Turn off the flame and let the spices cool down a bit. Grind them into a fine powder and add this spice mix to the cooking tamarind mixture.
  7. Keep cooking while stirring every now and till the mixture starts to thicken up a bit and reduces down to 3/4th of its original quantity. 
  8. Once it thickens a little and you can see it turning shiny, turn off the flame. Do not be compelled to thicken it more since it will thicken up a fair bit after cooling down completely and upon chilling.
  9. Add the vinegar to the chutney and let it cool down completely before filling it into the clean and dry air-tight container/jar. 
  10. Refrigerate and always use a clean and dry spoon to take out the desired amount of chutney. Enjoy with your favorite snacks.
Yields: 6 cups approx 


Green Chutney

Ingredients:

Fresh Mint Leaves: 2 cups
Fresh Cilantro/Coriander: 1 bunch (roughly chopped)
Green Chilies: 1,2
Cumin Seeds: 1/2 tsp.
Salt: 1/2 tsp.
Water: 1/4 cup

Method:

  1. Put all the ingredients into a blender jug and blend well till it turns into a smooth paste. 
  2. Take out into an air-tight container/jar. 
  3. Refrigerate and serve according to need by taking out with a clean and dry spoon. Enjoy with your favorite snacks.
  4. Can be frozen by following the instructions mentioned above in the description. 
Yields: 1 1/2- 2 cups


*Bonus Recipe*


Yogurt Chutney/Mint Raitha

Ingredients:

Green Chutney: 1/4 cup (2 thawed cubes if using frozen)
Plain Unsweetened Natural Yogurt: 1 cup (beaten and preferably thick)
Water: 4,5 tbsp. (if required)

Method:

  1. Mix everything together well. Add a little water if the chutney seems too thick.
  2. Chill well before serving. Enjoy with your favorite snacks, rice or and vegetable or meat meal.
  3. Can stay good for a day in a refrigerator.
Yields: 1 1/2 cup approx.


That's all folks! :) The spice level can always be adjusted according to your taste buds. I hope you enjoy making and eating them. Until next time, keep sharing the goodness of this greatest blessing, that has been bestowed in abundance upon us the lucky ones, with the less fortunate ones.
Thank you and please this Ramadan do remember everyone esp. The Ummah-e-Muslimeen (Muslim Nation) in your Du'as/prayers including me :)

Jazak'Allah Khair(May Allah reward you)

*Not be duplicated, rewritten or published without permission- Thank you!