Friday, June 12, 2015

Bengali Chana Chaat


This is another food item the memory of which takes me back to the time when we used to have this Chaat in the K.S.A. These Bengali hawkers used to sell this type of Chana Chaat (Chickepeas Chaat) from their makeshift carts that upon visiting this famous market called Hiraaj was a must to have. In 1 SAR, in a disposable plastic bowl, the hawker would put a ladle full of Chaat and then topped it with some finely chopped onions, coriander/cilantro leaves, green chilies if you've asked for them and then a squeeze of lemon and there you go, the light hunger pangs would be satisfied till you have a big weekend dinner that mostly consisted of Al-Baik (a famous local fried chicken chain) Ah, those were the days! Later some of the hawkers tried to enhance the flavor of this delicious snack by sprinkling some puffed up rice on top and the addition of this crunchiness really made it more tasty.

After moving back to the country a few years back, one of the things I really missed about Jeddah, K.S.A was this Bengali Chana Chaat. Last year during Ramadan, I decided to recreate it by keeping in mind the flavor, texture and the look of the Chaat I remembered and somewhat succeeded in achieving the same results. I looked online for the recipe of it but to my surprise, didn't find anything, maybe they call it by a specific name in their language but still, my experiment was able to satisfy my craving for that Bangali Chaat. I'd like to share the recipe with you all who really miss eating that Chaat which is certainly a part of my fond childhood memories :) and those of you who hasn't ever tasted it, will definitely get an idea that how lovely this moreish snack is :)   

Lets get some memories unleashed today! :D


Bengali Chana Chaat

Ingredients:

Boiled chickpeas: 2 cups
Tomato: 1 medium sized (chopped)
Onion: 2 medium sized (chopped)
Oil: 1 tbsp.
Salt: 1 tsp.
Red Chili Powder: 1/2 tsp.
Coriander Powder: 1/4 tsp.
Cumin Seeds: 1 tsp.
Turmeric powder: 1 tsp (this will give it that good vibrant color and a lovely taste)
Chaat Masala: 1/2 tsp (optional)
Water:250 
ml
Coriander/Cilantro leaves: 1/4 cup (chopped)
Mint leaves: 1/4 cup (chopped) (optional)
Green Chilies: 1,2 (chopped)
Lemon: for garnishing (Cut into halves or wedges)
Rice Puffs and some extra chopped onions: for serving.

Method:

  1. In a pressure cooker (or a regular pot) heat the oil and crackle the cumin seeds in it.
  2. Add half of the chopped onions and saute for 30 secs.
  3. Add water (add extra if cooking in a regular pot) and all the spices except for the Chaat Masala (if using)
  4. Close the cooker's lid and wait for it to whistle for 5 mins (or tightly cover a regular pot with its lid and cook for 15 mins on low heat)
  5. Uncover the cooker, you should have soft onions mixture by now. Mash it well with the help of the spoon until it turns in to a smooth paste like consistency. (cook longer in the regular pot to get the desired consistency)
  6. Add boiled chickpeas to onion mixture and mix well. 
  7. Switch off the flame and let the Chaat cool down a bit before giving the final touches to it. 
  8. After it's cooled down, add the remaining ingredients but save some greens for the garnishing. 
  9. Take out into the serving dish, garnish and serve warm or at room temperature along with the rice puffs, chopped onions and lemon halves/wedges. Enjoy!
Serves 4-6

That's all people! :) The spice level can always be adjusted according to your taste buds. I hope you enjoy making and eating it. Until next time, keep sharing the goodness of this greatest blessing, that has been bestowed in abundance upon us the lucky ones, with the less fortunate ones.
Thank you and please this Ramadan do remember everyone esp. The Ummah-e-Muslimeen (Muslim Nation) in your Du'as/prayers including me :)

Jazak'Allah Khair! (May Allah reward you)

*Not be duplicated, rewritten or published without permission- Thank you! 


Wednesday, June 10, 2015

Gujjia- Fried Sweet Crescents


Another unique fried food which is best as an Iftaar (breaking of the fast meal) special and the beautiful thing about it is that its sweet! Now, for a person like me who has a massive sweet-tooth, something sweet has to be present on the Iftaar spread at mine hence,  these sweet stuffed pastries are a great choice that I do make at least twice during the month of Ramadan (Muslim's month of fasting) besides, its favorite of one of my sisters too :)

I didn't know that this flaky pastry stuffed with roasted semolina and nuts is called Gujjia until recently. We've always called this delectable treat 'Meethay Samosay' (sweet triangular fried pastry) and still prefer calling it that. The memory of eating them first goes back to the time when I was a little girl (not so long ago :P) There was one of Dad's friends whose wife came from Pakistan and my mom and she became friends too esp. for the reason that they belong from the same town. She used to visit us often and one day during our Summer vacation, she came to visit us during the day and brought some homemade Gujjias (at that time introduced to us as Meethay Samosay) She called them Ladoo and I don't know why :D out of curiosity, I nibbled on one and to my pleasant surprise, liked the taste and crispy, flaky texture of the pastry along with the deliciously sweet stuffing!  

Ready to be fried and the other half can be frozen


My Mom never made them but upon our visit to my Mom's hometown next time, while being out in the local Bazaar (market) with one of my Khalas (maternal aunts) I saw a Halwai (confectioner) frying these tasty Gujjias and later displayed some freshly taken out of the oil Gujjia over a large sieve like platter. I instantly asked my Khala to buy me some and I got to taste it again after a few years. But to my surprise this time, those were stuffed with Gajjer ka Halwa instead of Sooji (semolina) but I still liked them. For some strange reason I never found out that what they are called exactly and kept on calling them Meethay Samosay or Crescents because of their shape. 

The memory of the ones I got to taste for the first time hovered over my mind once in a while and the craving for this exquisite snack persuaded me to try making it on my own. After looking at different recipes online, I found out that the pastry is similar to how I make Papri (fried crispy dough) thus, the quest got easier for me and I rolled up my sleeves and got ready to try my hand on making these utterly delish sweet treats. The stuffing I prepared by simply following my memory of it to be like when I had Gujjia for the first time. Another best thing about this snack is that you can make them days ahead and fry them later. The fried ones can even stay good up to 2,3 days in an airtight box. Some people immerse them in to warm sugar syrup after preparing but I've neither eaten nor have tried making them that way. 

So shall we see how these lovelies are made? Lets get some sweet cravings Unleashed today! :D 


Gujjia

Ingredients for the dough:

Flour: 2 cup
Ghee (clarified butter): 1/4 cup
Semolina: 2 tbsp. (soaked in 4 tbsp. of water and then sieved)
Salt: 1/2 tsp
Cumin Seeds:1/4 tsp
Water: as required for kneading the dough
Oil: For deep frying

Ingredients for the stuffing:

Semolina: 1/2 cup
Desiccated Coconut: 1/4 cup
Mixed nuts (any of your choice): 1/4 cup (chopped)
Sultanas: 2 tbsp.
Fennel Seeds: 1 tsp. 
Sugar: 1/2 cup
Powered Milk: 2 tbsp.
Water: 5,6 tbsp.

Method:

  1. Put the flour along with the soaked and sieved semolina and ghee. Rub with your finger until the mixture resemble breadcrumbs like texture.
  2. Add enough water to knead it into a stiff dough. Cover with a damp tea-towel and put aside.
  3. In a pan, dry roast all the dry ingredients over low flame except for the powdered milk and sugar. 
  4. Once the aroma is released and the color of the ingredients slightly changes, add sugar and the milk powder.
  5. Mix everything together and add the water. The mixture will be partially sticking together yet would be dry still. 
  6. Turn off the flame and put the prepared stuffing aside to let it cool down completely.
  7. Prepare small dough balls by taking some of the kneaded dough and rolling it in between the palms of your hands. Grease your hands a bit with some oil if needed. Cover the prepared balls with a damp tea-towel to prevent drying. 
  8. Flatten one dough ball over your working surface and roll it out around 4 inches in diameter and 1/2 inch thickness. Prepare all the dough ball rounds in the same manner and again cover with the damp tea-towel
  9. Place a generous amount of the stuffing in one half of the rolled out dough ball with a help of a spoon.
  10. Now fold the other half over the top of the filling and press the edges together so its sealed. 
  11. Pinch and twist the edges to obtain the design you see on the Gujjias.
  12. Prepare all the Gujjias in the same way. At this point they can be frozen by laying them over a freezer-safe tray without overlapping them. Once frozen, put into a freezer-safe bag and freeze for the later use.
  13. Heat oil in a large frying pot or wok over medium heat.
  14. Once the oil is hot enough to start frying the Gujjias, lower the heat down a bit and carefully put 3,4 Gujjias into the hot oil. 
  15. After a minute or two, change sides of the Gujjias with a help of a slotted spoon. Fry till they're golden brown and take out into a sieve or on an absorbent paper. Fry all the Gujjias into batches.
  16. Serve warm and enjoy.
Makes 10-12


That's all Cooks! :) The sweetness level can always be adjusted according to your taste buds. I hope you enjoy making and eating them. Until next time, keep sharing the goodness of this greatest blessing, that has been bestowed in abundance upon us the lucky ones, with the less fortunate ones.
Thank you and please this Ramadan do remember everyone esp. The Ummah-e-Muslimeen (Muslim Nation) in your Du'as/prayers including me :)

Jazak'Allah Khair! (May Allah reward you)

*Not be duplicated, rewritten or published without permission- Thank you! 


Tuesday, June 9, 2015

Kalay Chanay kee Chaat- Bengal Gram Chaat.


There are a variety of Chaats that are prepared especially during the month of Ramadan and Kalay Chanay kee Chaat is one of them. Legumes are a great source of protein and provides with the energy which is specifically required after fasting for as long as 20 hours in some places! Besides, Chaats are lighter on the stomach and better and healthy than the fried food that's consumed in this one month more than we do all year round.

This is one kind of Chaat which is my favorite after Dahi Bharay and my Mom makes it best. I can happily gobble down a big bowl of this scrumptious and mouth-watering snack anytime of the year. In fact I love Kalay Chanay; even when my mom makes Black Gram curry, I always ask her to take out some Channay for me after she finishes doing the Bhoonai (cooking on medium heat so that the moisture evaporates and the oil separates from the food cooking) and before adding water to make gravy. I then top it with thick curd and Chili-Garlic Sauce and enjoy life like one happy individual :D Kalay Chanay and Rice is my youngest sister's favorite meal and upon knowing that I'm doing a recipe post on this Chaat, my mom has announced that tomorrow she's cooking its curry and rice for dinner (so at the same time the conundrum "what to cook for dinner tomorrow?" is solved for the day :P) and my youngest sister is grinning :D

Addition of the crunchy veggies enhance the flavors

Making of this spicy, tangy and savory snack is extremely easy and somewhat quick if you own a pressure-cooker. Even if you don't, you can easily boil the pre-soaked Black Grams in a regular pot and prepare it by adding the ingredients required in making it. A friend of mine followed my instructions and easily prepared the Chanas in her cooking pot and she was good to go :) but to shorten the cooking time, I suggested her to add a pinch of Bicarb of Soda and the addition really helped in cooking the Grams faster. There are various ways of preparing it but the way I will share with you is how my Mom makes this Chaat and it always turns out lovely.
Here, the love of Chaat gets unleashed again! :D


Kalay Chanay kee Chaat

Ingredients:

Black Gram (Kalay Chanay): 2 cups (soaked in lukewarm water for at least 2 hours)
Salt: 1 tbsp.
Red Chili Powder: 1 tsp.
Red Chili Flakes: 1/2 tsp.
Turmeric Powder: 1/4 tsp.
Coriander Powder: 1/2 tsp.
Chaat Masala: 1 tsp.
Cumin Seeds: 1/2 tsp.
Carom Seeds: 1/2 tsp.
Nigella Seeds: 1/4 tsp.
Mustard Seeds: 1/4 tsp.
Sugar: 1 tsp.
Ginger&Garlic Paste: 1 tsp.
Tamarind Pulp: 1/4 cup (a few tamarind pods soaked in warm water for a few minutes and then squeezed to obtain thick pulp. Discard the seeds) 
Onions: 2 medium sized
Tomatoes: 2 medium sized 
Green Chilies: 2 (chopped) (optional)
Cucumber: 1 large sized (diced)
Cabbage: 1/2 cup (shredded)
Cilantro/Coriander Leaves: 1/4 cup (chopped)
Mint Leaves: 1/4 cup (chopped)
Oil: 2 tbsp.

Method:
  1. Put the soaked and drained Chanay into a pressure cooker (or to a regular pot and add 1/4 tsp. of bicarb of soda) along with the salt, chili powder, turmeric powder, coriander powder and the ginger&garlic paste. 
  2. Blend one onion and one tomato into a bender jug or with the help of a hand-held blender by adding little water.
  3. Put this paste to the cooker with the Chanay and spices in along with enough water that its about 2 inches above the grams. 
  4. Pressure cook them for 20-25 minutes or till they are cooked. Check by pressing one Chana in between your two finger. If not, then pressure cook for a few minutes more and add more water if needed. (The cooking time may take longer than 45 minutes in a regular pot) 
  5. The cooked Chanas should be saucy if not then let the moisture evaporate before proceeding to the next steps.
  6. In another pan, heat two tbsp. of oil and crackle all the seeds in it.
  7. Add this tempering to the cooked Chanas along with the tamarind pulp, sugar, chili flakes and Chaat Masala and mix well.
  8. Cut the other onion and the tomato into small cubes and add them to the Chanas with the cucumber cubes, shredded cabbage and half of the leaves and the chilies. Mix well.
  9. Take out into a serving bowl, garnish with the other half of the cilantro/coriander, mint leaves and green chilies.
  10. Serve warm or cold with some thick yogurt and any sauce or chutney of your choice. Enjoy
Serves 4-6

That's all readers! :) The spice level can always be adjusted according to your taste buds. I hope you enjoy making and eating it. Until next time, keep sharing the goodness of this greatest blessing, that has been bestowed in abundance upon us the lucky ones, with the less fortunate ones.
Thank you and please this Ramadan do remember everyone esp. The Ummah-e-Muslimeen (Muslim Nation) in your Du'as/prayers including me :)

Jazak'Allah Khair! (May Allah reward you)

*Not be duplicated, rewritten or published without permission- Thank you! 


Sunday, June 7, 2015

Pakoray- Fried Snack


Pakoras are a must on our Iftaar (breaking of the fast meal) menu! My Dad's most favorite snack that he can even have as a main-course since he delightedly savors them any day and any time of the year! The other day my Mom and I were having a chat and we started discussing a bit about Ramadan and how in this heat when the temperature soars to 45C, the only thing you wish to have at Iftaar time is some refreshing drink. My mother agreed and said that we will avoid making fried snacks this time altogether (something she says every year before Ramadan but something that never really ever happened :P) My dad was sitting nearby and was busy on his phone apparently but upon hearing my mom saying that, his sudden shocked reaction with the question was "Kiya, Pakoray nahin banain gaye iss baar?!" (what, there won't be any Pakoras this time?!) and my mom and I both burst out laughing :D that's how much he loves Pakoras! I'm sure you all got the idea now :D but we did assure him that there will be Pakoras ;)

Pakoras served with Green Chutney

This chickpea-lentil-flour-mixed-with-some-vegetables-fried-snack is very famous all across the South Asian counties and in every region, they make it in their own way and style. Even the Western taste buds have become familiar with them now as they are not only sold at the Pakistani and Indian eateries in various countries all across the globe but are prepared at homes also. These spicy and crispy treats are something that are specially prepared during Ramadan is almost every household. So, why am I doing a recipe post on these oh-so-common food item? Well, my recipe is a mastered skill, if I may say so myself without sounding pretentious :P and many of my friends often complain that their Pakoras never turn out crispy or doesn't stay crispy for long. They become soggy and sometimes absorb too much oil. So my recipe or I should say the way of making Pakoras will not disappoint you, In Sha Allah (God Willing) but the key to success is using good quality, fresh Baisen (chickpea lentil flour) always. They are quick to make, no beforehand preps are needed and always turn out just perfect :D Alhumdulilah (Praise to Allah) 

Lets begin some Pakora making get unleashed today then! :D


Pakoray

Ingredients:

Chickpea Lentil Flour (Baisen): 1 cup
Onions: 2 medium sized (sliced)
Potatoes: 1 large (thinly sliced in bite-size pieces)
Fresh Spinach Leaves: 1/2 cup (chopped)
Fresh Cilantro/Coriander: 1/4 cup (chopped)
Green Chilies: 2 
Salt: 1 tbsp
Red Chili Powder: 1 tsp.
Turmeric Powder: 1/4 tsp.
Coriander Powder: 1/4 tsp.
Coriander seeds: 1 tsp.
Cumin seeds: 1 tsp.
Carom seeds 1/4 tsp.
Garlic Powder: 1/4 tsp.
Ginger Powder: 1/4 tsp.
Dried Fenugreek Leaves: 1 tbsp. (optional)
Baking Soda: 1/4 tsp
Lemon Juice: Juice of one small lemon.
Water: as required
Oil: For deep frying.

Method:
  1. Mix all the cut vegetables along with all the spices and lemon juice and baking soda in a large mixing bowl.
  2. Let this stand for a few minutes so that some juices from the vegetables are released because of mixing with the seasonings.
  3. Now add the Chickpea lentil flour to these mixed vegetables and mix well so that everything binds together well. Use a little bit of water if needed otherwise there wont be any need. (as shown in the pic below)
  4. Heat oil in a large frying pot or wok over medium flame.Once the oil is heated enough to start frying, drop a little prepared mix with a help of a tablespoon into the hot oil. Repeat the process without over-crowding the frying utensil.
  5. After a minute or two, turn the Pakoras gently with a help of a slotted spoon and fry till they are golden brown and crispy.
  6. Repeat the process and fry Pakoras into batches.
  7. Take out the fried Pakoras into a draining sieve or on an absorbent paper. 
  8. Serve hot with the Chutney or sauce of your choice but they best go with Tamarind or Mint Chutney. 
Serves 6-8

Prepared mixture

That's all folks! :) The spice level can always be adjusted according to your taste buds. I hope you enjoy making and eating them. Until next time, keep sharing the goodness of this greatest blessing, that has been bestowed in abundance upon us the lucky ones, with the less fortunate ones.
Thank you and please this Ramadan do remember everyone esp. The Ummah-e-Muslimeen (Muslim Nation) in your Du'as/prayers including me :)

Jazak'Allah Khair! (May Allah reward you)

*Not be duplicated, rewritten or published without permission- Thank you! 


Saturday, June 6, 2015

Dahi Bharay Chaat


Ramadan 1436 is just around the corner In Sha Allah (God Willing). The Holy month of Blessings, Forgiveness, and Maghfirah (forgiveness from hellfire) is a time that every devout Muslim look forward to. Fasting in the name of Allah and for Him alone for 29/30 days is an opportunity to not only purify one's soul but to get as much as spiritual benefits one can obtain by doing Ibadah (prayers) and fulfill one of the basic Islamic duties of every Muslim man and woman.

Just as our goal should be to gain the most from this blessed month and spend minimal time in the kitchen like every year, therefore, this time as it will be my first Ramadan blogging so, I've decided to start sharing some quick and easy recipes that I prepare for my family during Ramadan. The plan is to share one recipe post every day till the start of the Holy Month, In Sha Allah :)

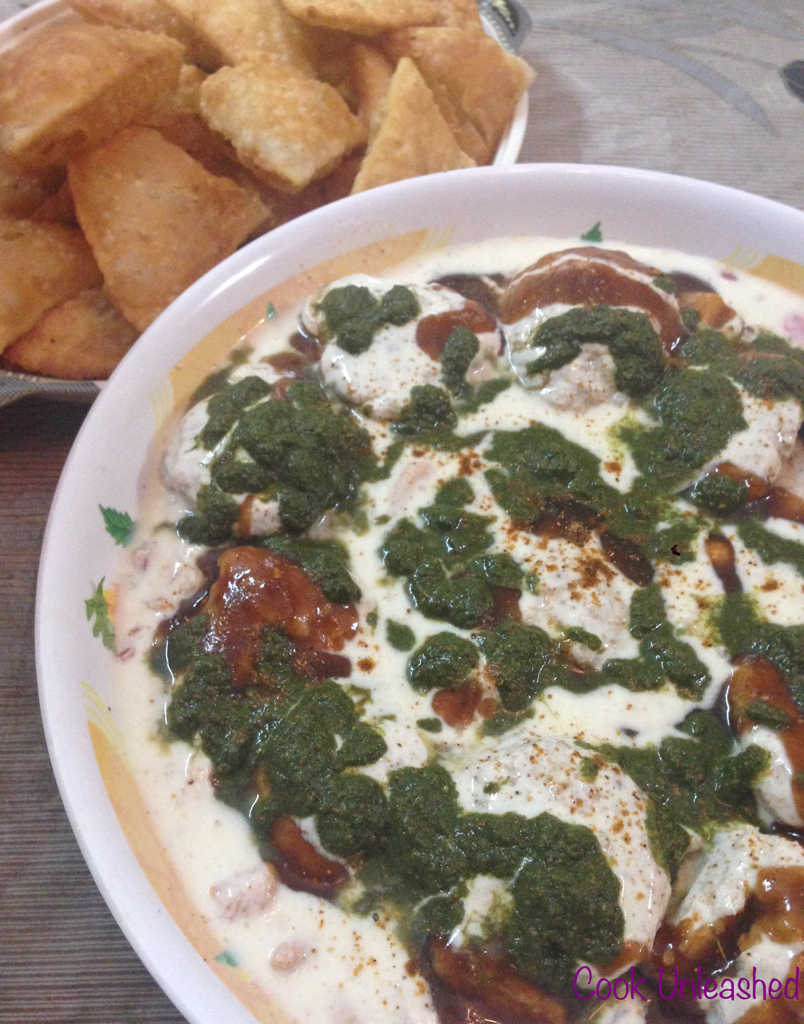
The first recipe that I've chosen to share with you all is my all-time favorite since forever! But to me Ramadan is incomplete without Dahi Bharas. Fried dumplings layered on top of a mix of boiled chickpeas and potato cubes, some fresh vegetables like sliced onions, cabbage, diced tomatoes, chopped green chilies and cilantro along with Pulkiyan (tiny fried strips of chickpea flour) and spices and then topped with some thick beaten curd and a blend of spicy, sweet and sour Chutneys (mint and tamarind) and Chaat Masala (a special blend of spices) and then served with Papri (crispy fried flour dough puffs) is definitely something to get anyone hooked on it. It is also one of the most famous snacks which are eaten in Pakistan, India and in some of the neighboring countries not only during Ramadan but all year round. 

Dahi Bharay served with homemade Papri

Every household has their own way of preparing this snack. Some just add fried and soaked dumplings into sweetened beaten yogurt and sprinkle some Chaat Masala on top and then serve with Imlee kee Chutney (tamarind chutney) but the way I am going to share is like what I have literally grown up eating. For the past two Ramadan I've started preparing some Iftaar (Breaking of the fast meal) dishes with my Mom. I've always seen her preparing Bharas (fried dumplings) Phulkian along with Spring rolls, Samosas (stuffed triangular pastries) in bulk and freeze them before Ramadan arrives to save time during Roza (state of fasting). She also prepared the Chutneys, stored them in airtight jars and refrigerated them. Now I help her in all these preps and below I am going to share how I make this scrumptious and lip-smacking Chaat.
Let's get some Ramadan preps unleashed! :D


 Dahi Bharay Chaat

Ingredients for Bharas:

Daal Maash (Split Black Gram/White lentils): 1 cup (washed and soaked in plenty of water for 1 hr)
Daal Moong (Split Green Gram/Yello Lentils): 1/2 cup (washed and soaked in plenty of water for 1 hr)
Salt: 1/2 tsp.
Carom Seeds: 1 tsp.
Ginger powder or Fresh Ginger root (crushed): 1 tsp.
Red Chili powder: 1/4 tsp. (optional)
Water: as much as required to blend the soaked lentils.
Oil: For frying Bharas.

Ingredients for Chaat:

Yogurt: 500 gms./2 cups (beaten)
Onions: 1 medium-sized (sliced)
Tomatoes: 1 medium-sized (diced)
Potatoes: 2 medium (boiled and cubed)
Cabbage: 1/2 cup (shredded)
Green Chilies: 1 (chopped) (optional)
Cilantro/Coriander Leaves: 1/4 cup (chopped)
Chickpeas/Garbanzo Beans: 1 cup (boiled)
Phulkiyan: 1 cup (homemade or store-bought, soaked in lukewarm water for a few minutes)
Salt: 1/2 tsp. or according to taste
Red Chili Flakes: 1/4 tsp. or according to taste.
Chaat Masala: 1 tsp. or according to taste.
Cumin Seeds: 1/4 tsp.
Sugar: 1/2 tsp.
Mint Chutney: 1/2 cup (homemade- recipe is on the blog)
Tamarind Chutney: 1/2 cup (homemade- recipe is on the blog)
Papri: 1 cup (crushed. Homemade- recipe shall be shared in the future posts)
Method:
  1. Put soaked lentils (separately) into a blender jug or chopper along with blend into a smooth paste-like texture by using as little water as you can.
  2. Take out the blended paste into a bowl, add salt, red chili powder, ginger powder or fresh ground ginger root and carom seeds. Mix well with the help of a beater till it becomes light and airy and pale in color.
  3. Heat some oil in a wide pan or wok over medium flame.
  4. Once the oil is heated, lower the flame. Spoon some batter with the help of a tablespoon into a shape of medium-sized dumpling. Repeat the process without over-crowding the frying utensil.
  5. Once the Bharas are fried from the bottom, flip them over gently with the help of a slotted spoon and fry them to a golden brown color. Take out on an absorbent paper.
  6. Repeat the process and fry all the Bharas in batches.
  7. Once al the Bharas are fried at this stage you can let them cool down completely, put them into a freezer-safe bag and freeze them.
  8. If you wish to prepare the Chaat right away, just soak the desired number of Bharas in some water at room temperature for a few minutes. Take out from the water, gently squeeze out the excess water by pressing each Bhara in between your palms and keep aside.
  9. In a large bowl, mix together all the cut vegetables, boiled chickpeas, potatoes, Phulkiyan, salt, chili flakes, some Chaat Masala, sugar and cumin seeds.
  10. In a large serving dish, put all the mixed Chaat, place and arrange Bharas on top of it.
  11. Now pour the beaten yogurt all over the Chaat and Bharas, drizzle both the Chutneys over it and sprinkle some Chaat Masala and cumin seeds on top.
  12. Serve chilled with Papri or put some crushed Papri on top of the Chaat at the time of serving.
Makes 12 Bharas approx.
Chaat serving: 4-6
Add caption
Batter and fried Bharas


That's all Chaat lovers! :) The spice level can always be adjusted according to your taste buds. I hope you enjoy making and eating it. Until next time, keep sharing the goodness of this greatest blessing, that has been bestowed in abundance upon us the lucky ones, with the less fortunate ones.
Thank you and please this Ramadan do remember everyone esp. The Ummah-e-Muslimeen (Muslim Nation) in your Du'as/prayers including me :)

Jazak'Allah Khair! (May Allah reward you)

*Not be duplicated, rewritten or published without permission- Thank you! 


Thursday, May 21, 2015

Oven-Baked Chicken Tikka/Tandoori Tikka


As a kid I hated chicken! Yes, you heard me right; I couldn't even stand the sight of it! And why was that? I had a fever once as a little girl and during that period of sickness, I started loathing this meat; the reason is not clear to me still but the thought of it used to give me a sick feeling. My parents put their utmost efforts to bring me back to liking it but, it was of no avail. It was after the umpteenth try that my Dad won the battle and what did he try feeding me that won my heart? Yep, you guessed it right! The scrumptious piece of Chicken Tikka; He put one morsel into my mouth and the burst of flavors got me hooked on it for life! So folks, that's how I found my love for chicken, by Chicken Tikka (if I don't sound like Ted from 'How I met your mother' :P)


The Chicken Tikka that my Dad fed me was barbecued but not every day you can fire up your barbecue grill esp. if you are living in the parts of the world where you don't get to see the sun often or the places where sun is too much in love with us (its 42 C in Lahore at the moment!) Therefore, we have used oven as a substitute to prepare this Tikka, whenever we wish to and made life easier for us. I can assure you that you'd not find any big difference in between the two ways of preparing this palatable chicken dish except that the one prepared over the coals would have that distinctive aroma and flavor that the oven-baked would lack. We can however overcome that 'foible' by simply placing a burning coal emanating the smoke, over the cooked Tikkas for a few seconds to infuse in that specific barbecued flavor and Voila, no one can say that these chicken pieces are baked and not BBQued.

This is one of my Mom's favorite dishes too and trust me she's very choosy when it comes to favorites. She won't admit it but she even applies the same rule while picking a favorite amongst her children. Although we very well know who that is but let's keep it a secret by saying all of us are her favorite (my mom's usual answer :P) So, on Mother's day I thought to specially prepare it for her along with Roasted Potatoes and for dessert I made Vanilla-Brownie Surprise cake (recipes will be in my future posts, In Sha Allah- God willing) 
She loved and all of us were delighted, Alhumdulilah (praise to Allah) :D

I used chicken cut into 16 pieces but you can use chicken cut into 4 or 8 pieces too to give that authentic Tikka look. The same marinated chicken can be prepared over the coals or the marinated boneless chicken threaded onto the wooden skewers can be baked instead, the choice is yours. So let me share with you my Mom's favorite Oven-Baked Chicken Tikka which is our family favorite and is certainly going to become your's very soon too :) 

Let's get some oven-baked bbqueing unleashed in your kitchens today! :D


Oven-Baked Chicken Tikka

Ingredients:

Chicken: 1 1/2 kg/2.20 lbs (cut into 16 or 8 or 4 pieces)
Yogurt: 1/2 cup (beaten)
Lemon Juice: 1/4 cup
Ginger Powder: 1 tsp (or 1 1/2 tsp of fresh ginger paste)
Garlic Powder: 1 tsp (or 1 1/2 tsp of fresh garlic paste)
Salt: 1 tbsp
Chili Powder: 1 1/2 tsp 
Turmeric Powder: 1/2 tsp
Coriander Powder: 1 tsp
Garam Masala Powder: 1 tsp
Cumin Seeds: 1/2 tsp
Red Food Coloring: a pinch
Meat Tenderizer: 1/4 tsp (optional) 
Mustard Oil: 1/4 cup (can use vegetable or olive oil instead)
Onion Rings: for garnishing

Method:

  1. Prick the chicken pieces with the help of a fork. If using 8 or 4 pieces portions, then mark deep slits on each chicken portion. Put them in to a wide mixing bowl.
  2. Beat the yogurt and add all the spices along with the lemon juice and the meat tenderizer (if using) and mix well.
  3. Pour the prepared marinade and the oil over the chicken pieces and mix well so that all of the marinade evenly coats over all the pieces.
  4. Now cover the bowl with its lid or with the help of a cling film and refrigerate for at least 6-8 hours prior to cooking. Overnight works best.
  5. Take out from the fridge about 15-20 mins before you start preparing for cooking.
  6. Preheat the oven at 200 C/392 F/Gas Mark 6.
  7. Line your baking pan with an aluminum foil and grease it with the help of a greasing brush.
  8. Place all the chicken pieces on the baking pan and spoon the marinade over all the pieces.
  9. Place the baking pan in to the middle rack of the oven and bake for 45-60 minutes depending on the size of the chicken pieces. Turn over the pieces half way through cooking.
  10. Once the chicken is cooked, all of the marinade dries but the chicken is still juicy, turn on the top grill of the oven and grill the chicken pieces for 8-10 minutes to give them that dark brown color.
  11. Take out of the oven, dish out and garnish with the onion rings.
  12. If wish to give the coal smoke to get that authentic barbecued flavor, aroma or the Tandoori effect, simply let the coal burn red hot over the stove. Once the Tikkas come out of the oven, put a piece of foil or stale bread in the middle of the Tikkas and place the burning hot coal piece on it with the help of a pair of tongs. Pour a drop or two of oil on that coal. Smoke will start releasing out of it. Cover the baking pan with a large lid or foil for a minute, NOT more than that. Uncover, take out the coal and the foil/bread piece and serve the Tikkas after garnishing.
  13. Serve hot with fresh Naan, Salad and Green Chutney or Mint Raitha (dip).
Serves 4-6


Ingredients needed

Pour marinade and oil over the chicken pieces
Marinated pieces

Ready to go in to the oven
Baked Chicken fresh out of the oven :)


That's all barbecue fans! :) The spice level and the baking time can always be adjusted according to your taste buds and the type of your ovens. I hope you enjoy making and eating them. Until next time, keep sharing the goodness of this greatest blessing, that has been bestowed in abundance upon us the lucky ones, with the less fortunate ones.
Thank you and please remember in your Du'as/prayers! :)

*Not be duplicated, rewritten or published without permission- Thank you!